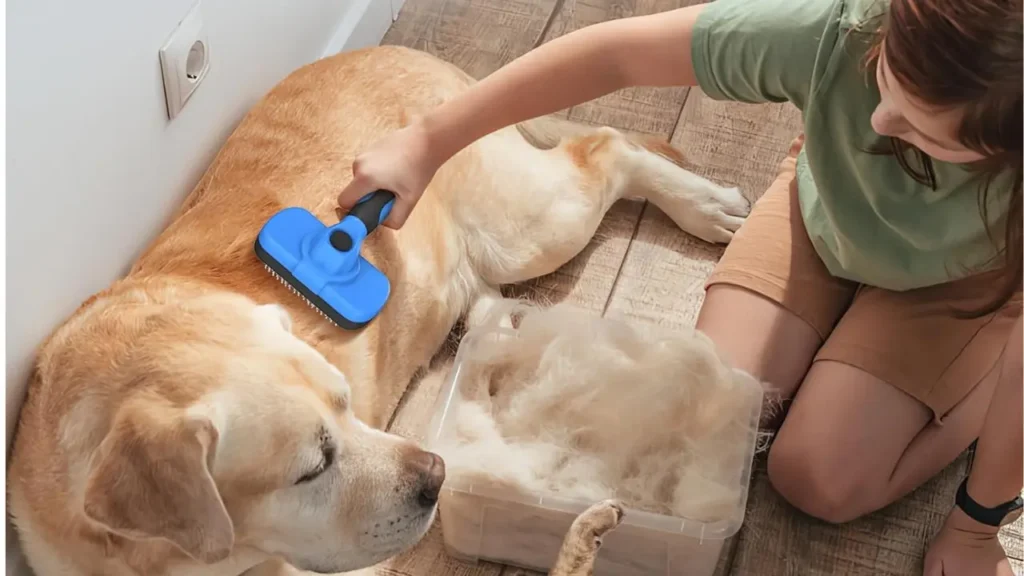
If you live with a furry friend, you already know that grooming is not just a routine, it is part of your bond with your pet. When I first brought home my golden retriever Bella, I quickly realized that grooming was not only about keeping her looking neat but also about keeping our home livable. The slicker brush became my everyday companion. It helped me manage her shedding coat and gave her that soft, shiny look we both loved. But I learned the hard way that the tool itself needs just as much care. Cleaning a slicker brush is not optional, it is essential. Neglecting it not only makes brushing less effective but can even be uncomfortable for your pet. This guide will walk you through everything I have learned about cleaning slicker brushes so you can keep your grooming sessions smooth, safe, and enjoyable.
Why Cleaning Slicker Brush Matters
A slicker brush is designed with fine wires that reach through your pet’s coat, removing loose fur, mats, and debris. Over time, hair, dander, and dirt build up in the bristles. If you do not clean the brush, it becomes clogged and loses its effectiveness. Worse, a dirty brush can harbor bacteria and cause skin irritation. I once skipped cleaning Bella’s slicker brush for a week and noticed her scratching more than usual. It turned out the bristles were not gliding properly, and a small tangle in the brush had started pulling at her fur. That was my wake-up call. A clean slicker brush is healthier for your pet and makes grooming far more efficient.
How Often Should You Clean a Slicker Brush
The frequency of cleaning slicker brush tools depends on your pet’s coat type and shedding level. If you have a heavy shedder like Bella, you may find yourself cleaning the brush after every session. Cats and short-haired breeds may not require cleaning as often, but once fur starts sticking to the bristles, it is time to give it attention. A quick clean after each use and a deep clean weekly is a good balance for most households.
Step by Step Guide to Cleaning Slicker Brush
Cleaning a slicker brush is simple once you get into the habit. I like to think of it as maintaining the tool that makes my pet look and feel good. Here is how I handle it:
Step 1: Remove the Loose Hair
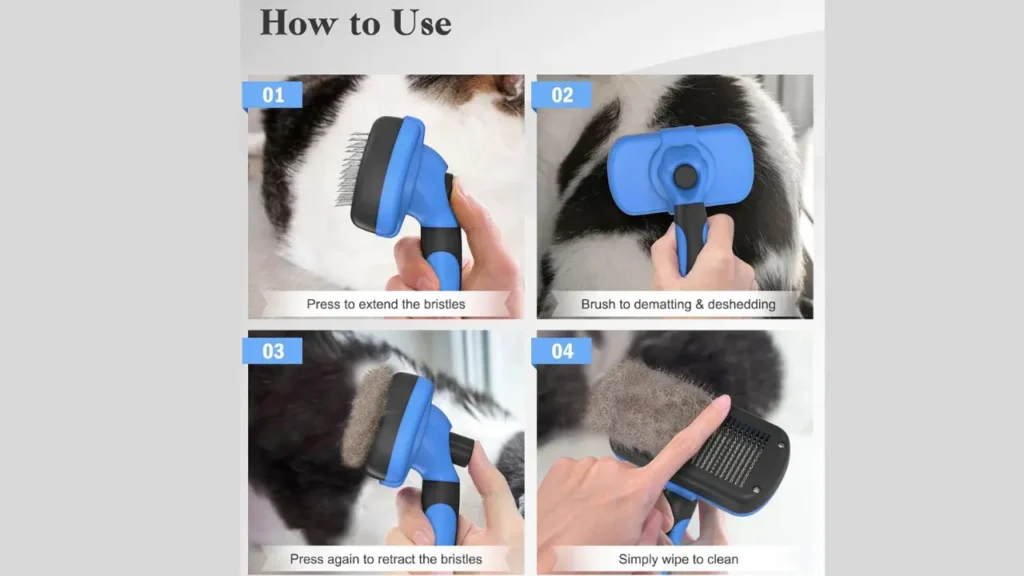
After each grooming session, I use my fingers or a wide-toothed comb to lift out the clumps of fur stuck in the bristles. For heavy tangles, a comb cleaner tool works wonders. The key is to avoid pulling too hard, which can bend the fine wires.
Step 2: Wash the Bristles
For a deep clean, I fill a small bowl with warm water and add a drop of mild pet-safe shampoo. I dip the brush head in and gently swirl it to loosen dirt and oils. Never soak the entire brush because water can damage wooden handles or loosen glued parts.
Step 3: Scrub Gently
Using an old toothbrush, I scrub between the wires to remove any stubborn debris. This step takes a little patience, but it is worth it to keep the brush fresh and hygienic.
Step 4: Rinse and Dry
I rinse the brush under lukewarm running water, making sure all soap residue is gone. Then I shake off the excess water and pat the bristles dry with a towel. Finally, I leave the brush bristle side down on a clean cloth to air dry completely.
Benefits of Cleaning Slicker Brush Regularly
When you take care of your slicker brush, you get better results and a happier pet. Grooming becomes smoother, faster, and more comfortable. A clean brush keeps your pet’s coat shiny, reduces shedding around your home, and prevents unnecessary skin irritation. I noticed that Bella’s grooming sessions went from being a chore to a relaxing ritual once I committed to keeping the brush in top shape.
Common Mistakes People Make When Cleaning Slicker Brush

I have made some of these mistakes myself, and they are more common than you might think. Soaking the entire brush in water is one of them, which can loosen bristles or warp wooden handles. Another mistake is using harsh cleaning agents like bleach or strong detergents. These can leave residue that irritates your pet’s skin. Rushing the drying process is also risky, since moisture trapped in the base can cause mold. Patience pays off here.
Best Tools for Cleaning a Slicker Brush
When it comes to cleaning a slicker brush, different tools play different roles. Using your fingers or a regular comb is the quickest way to remove loose fur after brushing, and while this method is easy and convenient, it is not as effective for tightly packed hair. A comb cleaner tool is especially helpful for pulling out stubborn clumps stuck in the bristles. It works quickly and efficiently, though it does come with the extra cost of buying it separately.
For deep cleaning, I often rely on an old toothbrush. It is precise and gentle enough to scrub away dirt and debris between the wires, although it does take more time to do a thorough job. Finally, mild pet shampoo is a safe and effective option for refreshing the brush. It cleans well and keeps the bristles hygienic, but it must be rinsed carefully to make sure no residue is left behind that could irritate your pet’s skin.
Tips for Extending the Life of Your Slicker Brush
From my experience, a slicker brush can last for years if you take care of it. Store it in a dry place away from direct sunlight. Do not let fur sit in the bristles for days. Always make sure it is fully dry before using it again. If bristles start to bend, use a small comb to straighten them gently, but if they are damaged, consider replacing the brush. Remember, a slicker brush is a small investment compared to the comfort it provides your pet.
Conclusion
Cleaning slicker brush tools may seem like a small task, but it makes a big difference in your pet’s comfort and health. I learned this firsthand with Bella, and now grooming has become one of our favorite bonding times. A clean brush means fewer tangles, less shedding on your furniture, and a happier pet. If you have been putting off cleaning your slicker brush, start today. It takes only a few minutes, and the payoff is huge. Your pet deserves the best care, and keeping your grooming tools clean is part of that love.
FAQs
Q1. How do I know when it is time to clean my slicker brush?
If the bristles look clogged with fur, dust, or dander, or if grooming feels less effective, it is time to clean it. A clean brush should glide smoothly through your pet’s coat.
Q2. Can I wash a slicker brush with dish soap?
While dish soap can remove oils, it may be too harsh for the delicate wires and could leave residue. A mild pet-safe shampoo is a safer choice.
Q3. How do I dry a slicker brush quickly?
After rinsing, shake off water and towel dry the bristles. Always let it air dry bristle side down. Avoid hair dryers or heaters as they can damage the brush.
Q4. Do I need a special tool to clean slicker brush bristles?
Not necessarily. Your fingers or a wide-toothed comb can do the job. However, a comb cleaner tool makes the process easier, especially for heavy shedders.
Q5. What happens if I never clean my slicker brush?
The brush will lose efficiency, collect bacteria, and could cause skin irritation or discomfort for your pet. Over time, it may even shorten the life of the brush.